Push-ups are one of those classic exercises you see everywhere, from bootcamps to yoga flows to strength workouts—and probably even in your gym class flashbacks. But if you find yourself grimacing whenever they pop up in your programming, you’re totally not alone.
There’s no sugarcoating it: The push-up can be hard AF. According to a study in the Journal of Strength and Conditioning Research, the from-the-floor version requires you to move up to 75% of your bodyweight. Think of it like this: A 150-pound person probably isn’t repping chest presses with 55-pound dumbbells right out of the gate, right? Still, tons of exercisers get down if they can’t do a push-up.
But we’re here to tell you: With some concentrated training, smart progressions, and determination to level up your strength, you absolutely can get your first push-up. We’ve got a step-by-step expert guide to mastering this popular-yet-challenging exercise.
There are some solid reasons to want to pump up your push-up skills in the first place.
Now, there’s nothing saying you have to master this exercise. But being able to do full-on push-ups with good technique can bring a host of legit benefits, including strengthening a ton of upper-body muscles (like your triceps, chest, and shoulders), boosting core stability, and improving your ability to complete day-to-day pushing motions, like heaving open a hefty door, certified personal trainer and performance coach Keith Hodges, CPT, founder of Mind In Muscle Coaching in Los Angeles, tells SELF.
Plus, all you need is your bodyweight, so you can do them anywhere, making them superconvenient. Finally, there’s the badass factor: Being able to bust out a set of from-the-floor push-ups is pretty empowering and can be the ultimate confidence booster.
How can I improve my (non-existent) push-up skills?
Sorry, but one of the best ways to better your push-up abilities is to practice the actual push-up motion—just in a more beginner-friendly format. By working your way through various modifications, you can hone good form while building up the specific strength, muscle memory, and movement pattern needed to do the full-on version correctly.
Basically, you want to start by practicing the actual exercise but with less load, eventually adding more until you work your way up to the full-blown thing. This way, you’re strengthening all the muscles that help you perform a push-up—including your chest, triceps, shoulders, back, and core—and getting your body familiar with the motion without jumping straight into the OG version. Training the specific movement pattern (rather than just strengthening the muscles in a more general way) is super important, since it helps your brain learn how to execute the motion correctly and maintain good form as you progress to more challenging versions of the exercise, Katie Pierson, CPT, a Montana-based certified personal trainer, spinning instructor, and contributor at Girl Bike Love, tells SELF.
Proper form is super important for doing proper push-ups. If you don’t have it quite down, certain muscles, especially in your shoulders and lower back, can end up taking on too much of the work. This can over-fatigue them and ultimately increase your chances of injury, Pierson says. Plus, if you’re not engaging all the muscles that should be firing—say, like your core—the move might even feel harder too, since you won’t really be moving your whole body as one unit.
Here’s what your push-up progression can look like:
1. Hands-Elevated Push-Up
Katie Thompson
- Place your hands shoulder-width apart on a low box, a chair, or a table and assume a high plank position with your feet, knees, hips, and shoulders in a straight line. Brace your core and keep your elbows tucked in close to the sides of your torso. This is the starting position.
- Bend your elbows and pull shoulder blades together to lower your chest to the box.
- Press through your palms to straighten your arms back to starting position. This is 1 rep.
In this modified push-up, you’re placing more weight in your lower body and reducing the amount your upper body has to push, which makes it more beginner-friendly. At the same time, you’re “still getting the range of motion and building that muscle that’s needed in order to progress,” Pierson explains. Plus, you’re giving your brain a chance to learn the correct movement pattern in a less intense format, which will set you up to maintain good form as you move onto more challenging versions. If placing your hands on a box, chair, or table is too challenging, perform push-ups with your hands against a wall—the more upright your body position, the easier the move will feel.
2. Knees-Down Push-Up
Katie Thompson
- Start in a high plank with hands slightly wider than shoulder-width apart, shoulders above your wrists, and your spine long.
- Drop to your knees, rolling to the top of your knees to protect your knee caps.
- Bend your elbows and lower your chest to the ground.
- Push through the palms of your hands to straighten your arms. That’s 1 rep.
In this variation, you’re still practicing the push-up motion, but you’re once again reducing the amount of weight your upper-body has to move by eliminating your lower legs from the equation. Still, this move generally feels a little harder, since, depending on how high you elevated your hands in the above variation, you’re now having to move more weight (though it’s significantly less than a full-on push-up). In fact, according to that Journal of Strength & Conditioning study, you need to support only up to 62% of your bodyweight in a knees-down push-up. If you want to make this variation more difficult, lift your toes off the floor to increase the stability challenge.
3. Concentric Push-Up
Katie Thompson
- Start lying on the floor with palms at chest level, elbows bent, toes on the ground, heels pointing up. This is the starting position.
- Push through the palms of your hands to straighten your arms as you engage your core and glutes and raise your body up as one unit into high plank position (don’t let your hips sag or your low back arch).
- From here, drop to your knees and bend your elbows to lower your chest to the ground. Place your toes on the ground, heels pointing up, to return to the starting position. That’s 1 rep. Make sure to keep your elbows close to your body and fingers pointing forward as you complete reps.
This variation emphasizes the concentric portion of the exercise, or the second half of the movement where your muscles are shortening under load—this is when you’re straightening your arms to raise your body back up to the start position. You’ll perform that part of the push-up from your toes, and then drop to your knees to complete the eccentric portion (the first half of the move, where your muscles are lengthening under load). Some people struggle to control themselves during the eccentric part, Pierson says, so this move keeps the knee modification for that part so you can continue to build up your strength there while challenging you to progress the difficulty of the concentric portion.
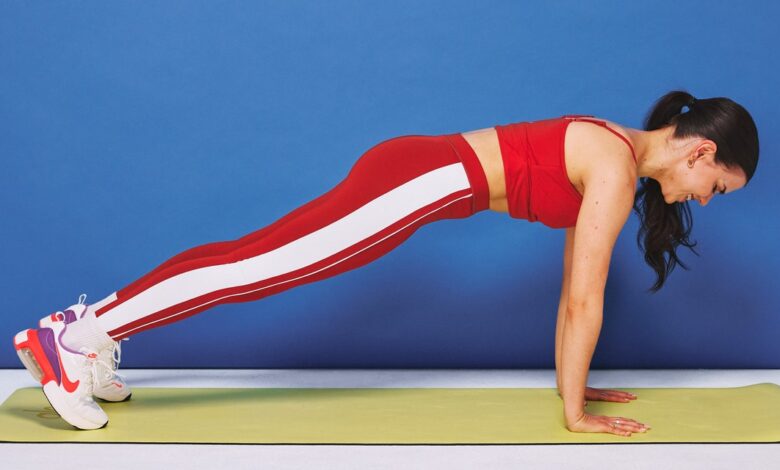
4. Push-Up
Katie Thompson
- Start in a high plank with your palms flat on the floor, hands shoulder-width apart, shoulders stacked directly above your wrists, legs extended behind you, and core and glutes engaged.
- Bend your elbows and lower your body to the floor.
- Push through the palms of your hands to straighten your arms. That’s 1 rep.
This is the real deal! Make sure to keep your core engaged the entire time so that you move your body as one unit—basically, don’t let your hips sag or hike up, since that form error can make the move less efficient and harder to complete with a full range of motion, Pierson says. It can also up your chances of injury, she adds.
Here’s what to do with the push-up progressions.
For an effective program, work through the moves in the order listed above. Practice each one—starting with the hands-elevated push-up, then the knee push-up, then the concentric push-up, then, finally, the regular push-up—and don’t move onto the next exercise in the sequence until you can do three sets of 10 reps of the previous one with stellar form. You’ll do just one move at a time; once you’ve mastered an exercise, stop doing it and focus only on the next move in the sequence. “If you’re not really struggling the last couple of reps, then you know that you’ve mastered that one and it’s time to try to increase in intensity,” Pierson says.
If you’re at a point in the sequence where you’re not yet able to do three sets of 10 reps with good form, then do three sets of as many reps as you can manage with proper technique, and stop as soon as your form starts to falter. This will only reinforce bad habits—and possibly up your risk of injury, since certain muscles may be taking on strain they’re not meant to.
There are some other exercises that help your goal along too.
Since push-ups require strength from a ton of upper-body muscles, it can also help to do other moves that target those same players. In particular, doing triceps-strengthening exercises like dips and presses can be really helpful since weak muscles in the back of the upper arms are a big reason people struggle with push-ups, Hodges explains. Moves like dumbbell chest presses are useful too, Pierson says, as they challenge many of the same muscles you need to engage for a push-up (like your chest muscles, the pec major and pec minor, as well as the triceps) and help you practice what it feels like to push a heavy load away from you.
5. High Plank Hold
Katie Thompson
- Start on your hands and knees. Your hands should be shoulder-width apart; your knees should be about hip-width apart.
- Lift your knees off the ground and step your feet back so that your legs are straight and fully extended.
- Keep your core, butt, and quads tight, and avoid arching your back. Think length—imagine that you’re extending out from the crown of your head and out through your heels simultaneously.
- Keep your neck in a neutral position by gazing at the floor a few inches in front of your hands.
- Hold for 10–15 seconds and repeat for 2 to 3 total sets. Over time, work your way up to 15- to 30-second holds, repeated for 3 to 5 total sets.
This core exercise helps you practice the starting position for a push-up and teaches your body what proper form for the exercise feels like, Hodges says—after all, a push-up is basically a moving plank. The high plank hold also engages your abs, back muscles, shoulders, and chest, Pierson says, all of which are key for nailing the push-up. Focus on keeping your spine in neutral alignment (don’t let your low back sag), Pierson says. If needed, drop to your knees and eventually work toward holding the position from your toes.
6. Dumbbell Chest Press
Katie Thompson
- Lie face up with your knees bent and feet flat on the floor. Hold a dumbbell in each hand with your palms facing your legs and your elbows on the floor bent at 90 degrees so that the weights are in the air. This is the starting position.
- Press the weights toward the ceiling, straightening your elbows completely and keeping your palms facing your legs. Pause here for a second.
- Slowly bend your elbows and lower them back down to the floor and out so that they are perpendicular to your torso. This is 1 rep.
- Do 6 to 8 reps. Repeat for 2 to 4 total sets.
While this move isn’t exactly mimicking a push-up, it’s targeting a lot of the same muscles that are involved in the exercise, including your triceps, pec major, and pec minor. Compared to the high plank hold, it’s a more challenging exercise since it involves moving external load through a range of motion (versus just holding your bodyweight in place), Pierson explains.
7. Triceps Dips
Katie Thompson
- Sit on the floor with your knees bent and feet flat and your back against a box or step. Place your hands on the box, fingers toward your body. If your box is high, like the one pictured here, place your hands on the box first and then walk your heels out so you can comfortably lower your body in front of the box without hitting it.
- Straighten your arms to lift your butt, then bend your elbows to lower yourself without sitting down completely. Keep your heels on the floor and your elbows pointed directly behind your body (not flared out to the side). That’s 1 rep.
- Do 6 to 8 reps. Repeat for 2 to 4 total sets.
This exercise, recommended by Hodges, really zeroes in on your triceps. “Usually during any pressing motion, the triceps are what give out first,” Hodges explains, so building up the strength in that muscle group can improve your ability to crush pressing exercises, which, yup, includes push-ups.
Here’s how to combine it all together into one bomb-ass, push-up crusher.
Aim to do all these exercises—both the push-up progressions and the “other” moves—two to four times a week. “If you want to see you progress, then consistency is the most important factor,” Pierson says.
But be careful you’re not overdoing it. Give yourself at least one day in between sessions so that your muscles have the time they need to recover and build back stronger. If you find you’re really sore at any point, then take 48 to 72 hours of downtime in between sessions, Hodges says.
Perhaps the most important tip? Remember that you’ve got this! We get it: Being able to do a from-the-floor push-up can seem impossible if your current ability level is close to zero, but with time and dedication, you can absolutely work your way to that goal. In fact, “one day, conventional push-ups will be easy,” Hodges says. Truth!
Demoing the moves above are Laura Girard (GIFs 1–5), a NASM-certified personal trainer and founder of The Energy Academy; Billy Anslow-O’Rourke (GIF 6), doctor of physical therapy and Queens-based group fitness instructor; and Amanda Wheeler (GIF 7), host of the Covering Ground podcast.
Related: